Table of Contents
ToggleHow to erase in Canva
The best way to erase in Canva is with the Magic Eraser tool. You can also use the Magic Grab tool, the Background Remover, or the Canva Draw tool. You can also crop the parts of the image you don’t want.
Is there an eraser tool in Canva?
Canva does not have a specific eraser tool, but you can erase text, photos, and graphic elements in Canva with the Magic Eraser tool. You can also erase the background or parts of an image or element with Magic Grab or Canva Background Remover or other tools.
In this post, I will focus on erasing visual elements, focusing on these crucial questions.
- How to erase part of an image or element with:
- The Magic Eraser
- Magic Grab
- How to erase an image background
- How to erase with the Canva crop tool
- How to erase a drawing
Related: Keywords to find Canva elements
1. How to erase part of an image in Canva
You can erase parts of an image with the Magic Eraser tool.
Select your image, click Edit Image, and choose Magic Eraser. Then, use either the Brush or Click option to select the parts you want to remove, and click on Erase.
How to erase part of an image in Canva with the Magic Eraser
1. Open your image in Canva
First, upload the image you want to edit by navigating to the ‘Uploads’ section on the left sidebar of the Canva interface.
Click ‘Upload media’ and select your file. Once uploaded, click on your image to add it to the canvas.
2. Select the Magic Eraser Tool
With your image selected on the canvas, look for the Edit button on the top toolbar.
Clicking this button will reveal a menu of editing options. Find and select the Magic Eraser from the list.

Magic Eraser is only available if you have Canva Pro, Canva for Education, Canva for Teams, or Canva for Nonprofit users. If you don’t have Canva Pro, try it out for 30 days.
3. Erase unwanted elements
Once you’ve selected the Magic Eraser tool, your cursor turns into a small circle. This circle represents the area that will be affected when you click or drag across your image.
Move it over the part of the image you wish to erase. Click or click and drag to remove unwanted elements.
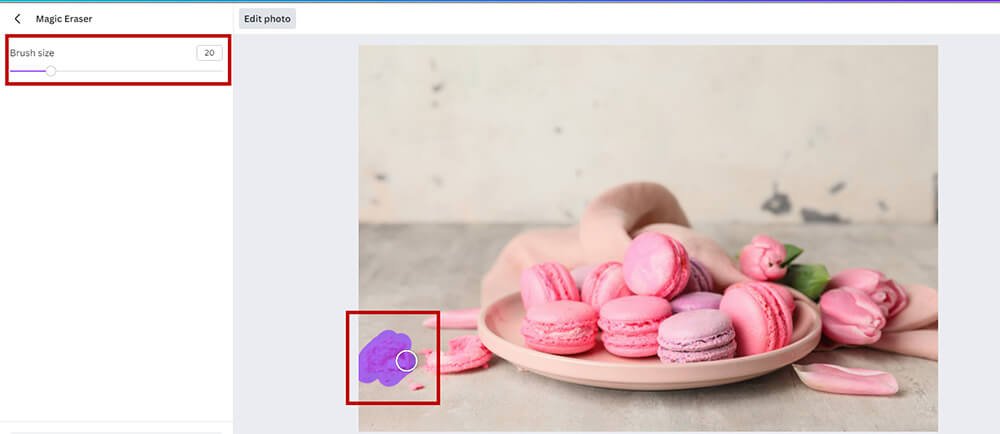
For more precise control over the erasing process, you can adjust the eraser brush size. This is particularly useful for smaller, more detailed areas or when working close to important elements you wish to preserve.
Look for the brush size adjustment option within the Magic Eraser tool settings and select the size that best suits your needs. You may have to use the eraser a few times to get your desired look.
The AI behind the Magic Eraser will automatically analyze and remove the selected area, blending the erased portion with the surrounding pixels for a natural look.
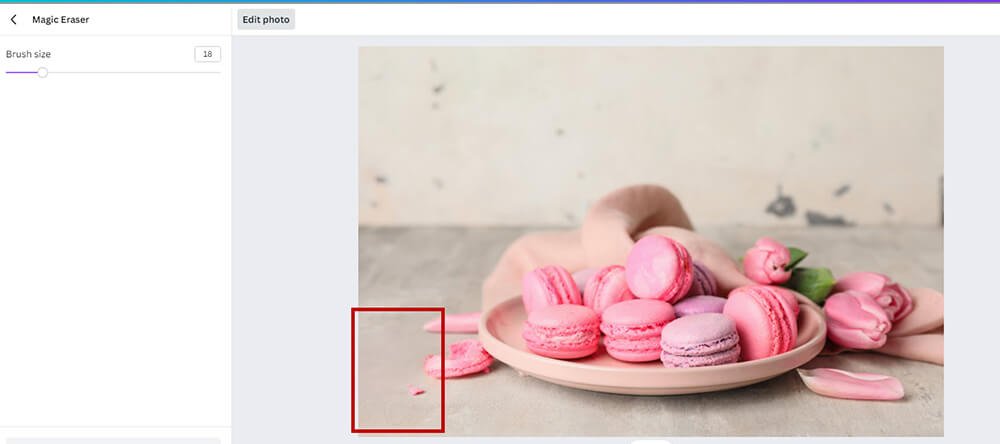
5. Refine your edits
The Magic Eraser tool is powerful, but you may need to refine your edits to achieve the perfect look. If you make a mistake or wish to undo a change, do CTRL + Z.
Additionally, you can zoom in on your image for more detailed work, ensuring every edit is precisely as you want.

Get access to all advanced Canva tools & content for 30 days
- Background Remover
- One-click Resize
- Video Editing
- 100+ Million Stock Media
- Content Planner
- AI tools - Magic Studio
Another great way to erase parts of an image or element is with the Magic Grab tool.
How to erase part of an image in Canva with Magic Grab
Select your image, then click on Edit, and then Magic Grab. Use the Brush or Click option to select the part of the image you want to erase, and then click Grab. Now, that part will be isolated from the main image, and you can delete it.
The Magic Grab is available for Canva Pro users only. You can try it with a 30-day free trial if you’re not currently subscribed.
Step 1: Select your image
Log in to Canva and open a new design or select an existing one where you want to edit an image.
Step 2: Access the Magic Grab Tool
Click on the image you want to edit.
Go to the Edit Image menu, then select Magic Grab.
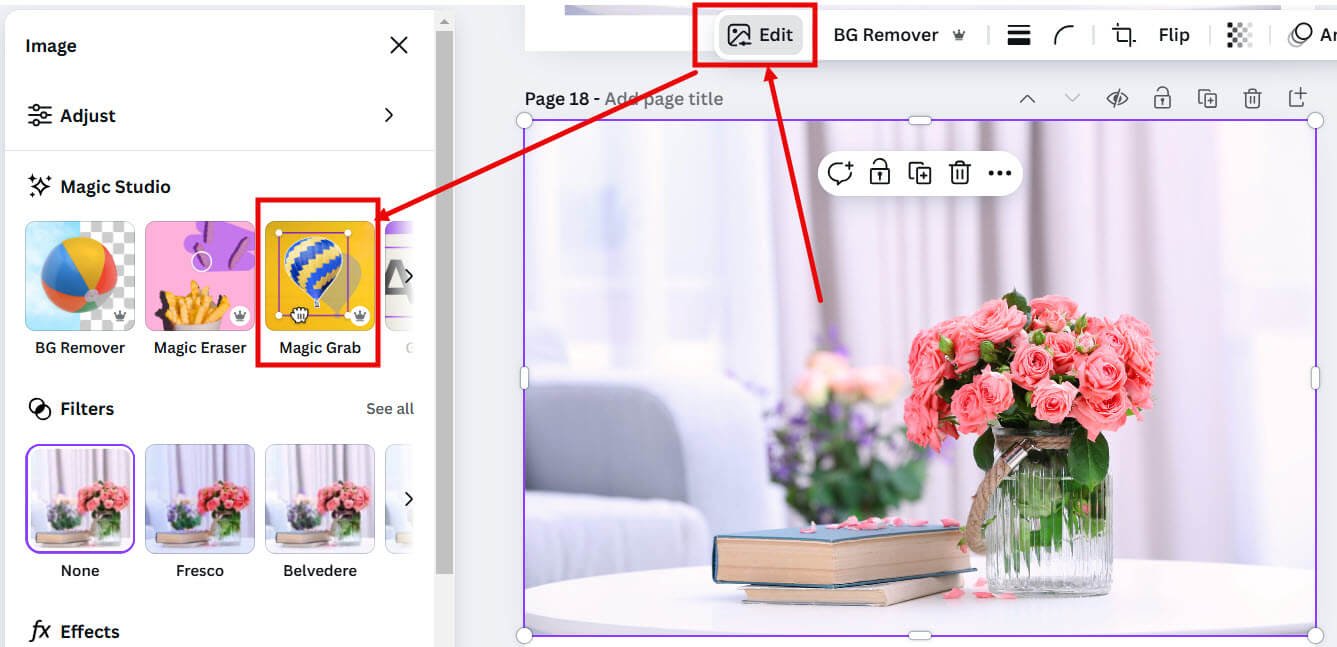
Step 3: Choose which part of the image to erase
You have two options:
- Click Option: Click on the part of the image you want to isolate or remove. Canva will automatically detect and select the object.
- Brush Option: Use the brush to color over the specific areas you want to isolate or remove. This method can be more precise but doesn’t let you quickly correct a mistake.
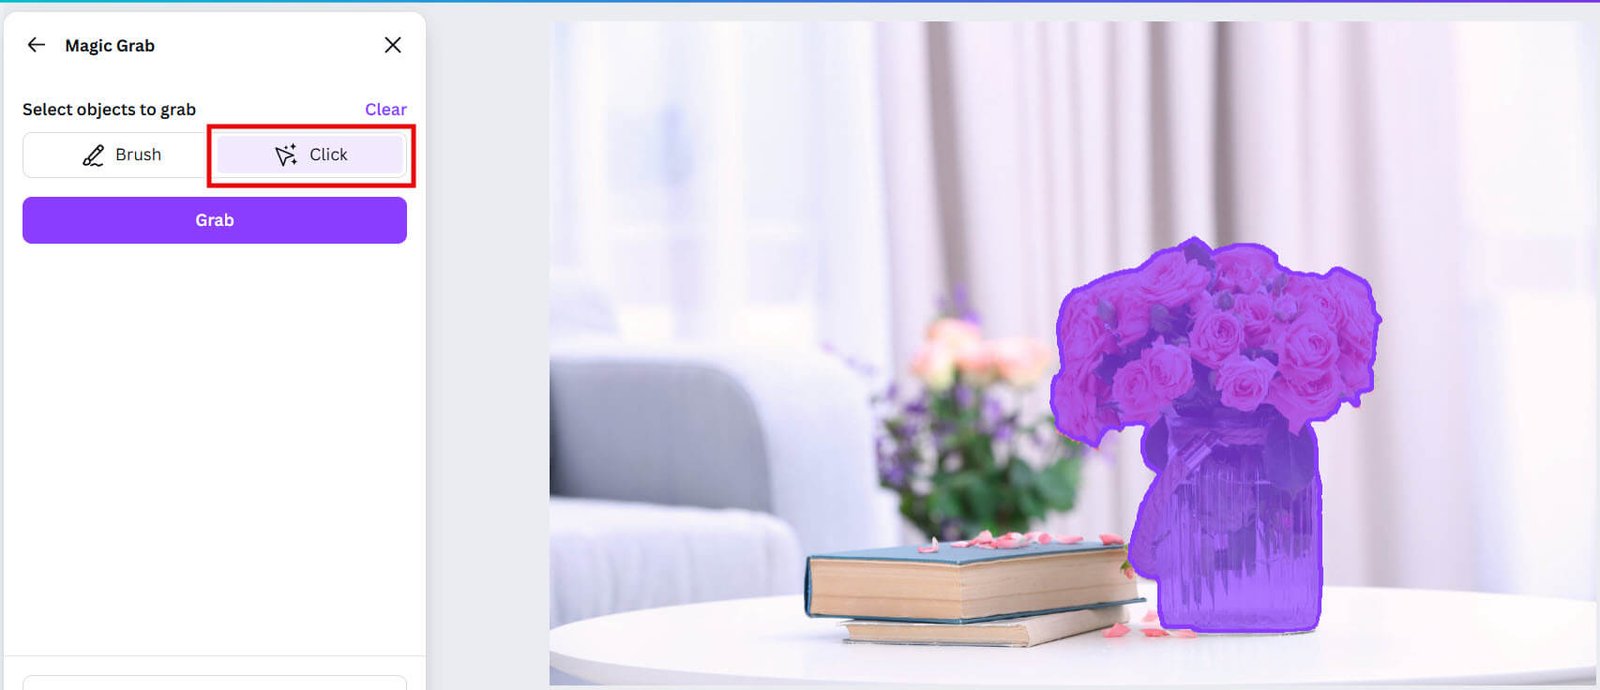
Pro Tip:
I would recommend the Click option as it is usually faster and more accurate, as it detects entire objects in one click.
Once you have selected the part of the image you want to remove, click on Grab.
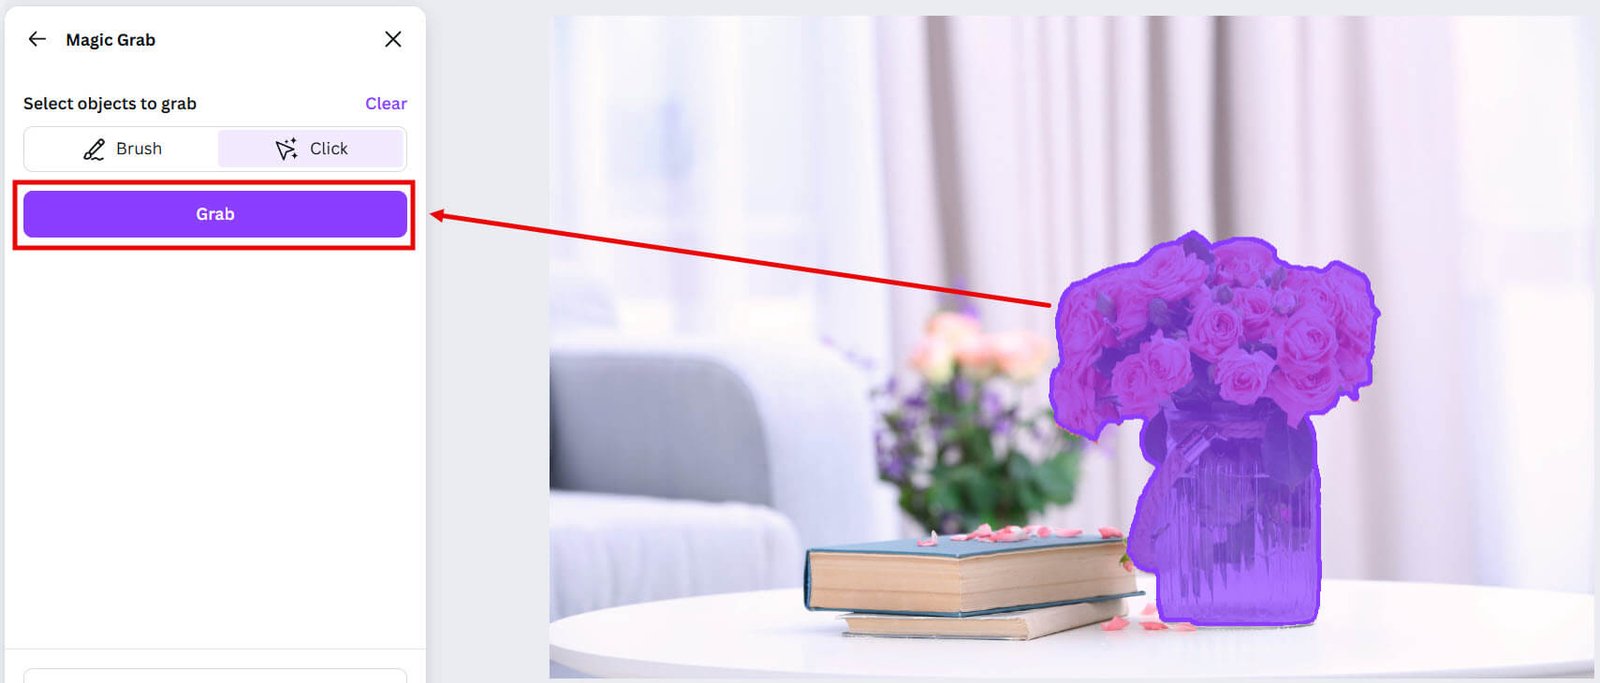
Step 4: Delete the part you want to erase
After selecting the object, Canva will isolate it and separate it from the background. You can then delete this part of the element.
Note: You can also move it around, resize it, or adjust it however you like.
You now have a clean edit with the object removed from your element.
Your object is isolated. Click on the trash icon to erase it.
2. How to erase part of an element in Canva
You can erase parts of elements in Canva just like you do for images: with Magic Eraser or Magic Grab. However, you have to make sure your graphic element is an image. You cannot remove parts of a vector graphic element with Magic Eraser or Magic Grab.
Graphic elements include stickers, illustrations, shapes, and other small elements you can use in your design. They are available as vector-like elements or as images.
If your element is a vector, you can change colors easily, but you cannot remove parts of the element. If it is as an image, you can erase parts of them, just like you can do with a photographic image, as you saw above.
Step 1. Select the element
Add the graphic element you want to remove or select an existing one.
Step 2. Choose your eraser tool
With the element selected, click on Edit, and click on Magic Eraser or Magic Grab.
Step 3: Select the parts you want to remove
Choose a brush size and brush over the part you want to remove, or select it with Click.
Step 4: Erase or Grab and delete
If you’re using Magic Eraser, click on Erase to remove the part you don’t want.
If you’re using Magic Grab, click on Grab, then click on the trash icon to remove the part of the element.
However, once again, you can’t erase them if the element is not available as an image but as a vector.

Canva Creative Effects Mastery - with Canva Apps
Learn how to use 44 Canva Apps to create unique & standout content like a pro – in just a few clicks!
2. How to erase background in Canva
You can erase the backgrounds of images in 1 click with the Canva Background Remover. Select your image, click on Edit and then BG Remover. Your entire image background will be removed. You can restore any parts you want with the Brush option.
1. Select your image
Select the image in your Canva design that you would like to erase.
2. Click on Background Remover
With the image chosen, click on Edit on the top menu.

Then, on the left menu, choose BG Remover. It will erase the entire background of your image.
3. Adjust the erased parts
If you want to remove additional parts of the image, click on Erase, choose a brush size, and brush out the extra parts you want to erase.

If you want to keep some parts of the background, click Restore and apply the tool on the parts to restore.

Pro tips:
1. You need a Canva Pro account to access the Background Remover tool.
2. The Background Remover will remove the entire background of your image.
3. Backgrounds of Canva elements are usually transparent and don’t have a color or photograph.
Nothing really happens when you click on Background Remover. However, you need to click on this to erase parts of the element.
Once you click on the Background Remover, the Erase/ Restore function becomes visible.
4. How to erase part of an image in Canva with the Canva crop tool
You can also erase some parts of an image by simply cropping it out.
1. Select the image you want to erase in part and click on the Canva crop tool.

2. Drag and drop the cursor as required to remove certain parts of the image


Get access to all advanced Canva tools & content for 30 days
- Background Remover
- One-click Resize
- Video Editing
- 100+ Million Stock Media
- Content Planner
- AI tools - Magic Studio
5. How to erase a drawing in Canva
You can use the Canva Draw tool to create freehand drawings and illustrations in Canva. The drawing tool comes with a brush, which you can use to remove parts of your drawing.
Read a step-by-step guide on how to do that in my full post on how to draw in Canva.
Once you create even the smallest of drawings, an eraser tool appears.

Just like with the Background Remover, you can choose the brush size you want to erase certain parts of your drawing.
An option for the eraser tool has been added to Canva Draw.
You can select the transparency of the brush. So, instead of completely erasing a part of your drawing, you can decrease its opacity.
In other words, you can use the eraser tool to reduce the intensity of a certain part of your drawing.
Those are the multiple ways you can erase in Canva with the Canva eraser tools.
Do you know any other way to erase in Canva? Do share in the comments!
FAQ: How to Erase on Canva
Can you erase in Canva?
You can erase parts of images or elements in Canva with tools like Magic Eraser and Magic Grab. You can erase image backgrounds with the Background Remover tool. You can also erase Canva drawings.
What is the Canva Magic Eraser
The Canva Magic Eraser is an AI-powered tool designed to easily remove unwanted elements from images. It precisely identifies and erases specific parts, ensuring the edits blend seamlessly with the rest of the image. This feature simplifies the process of enhancing image aesthetics within Canva.
Can you erase part of an element in Canva?
You can erase parts of a graphic element if it is an image format, not a vector format. You can erase with the Canva Magic Eraser or the Magic Grab tool.
Can you erase part of a graphic in Canva?
You can erase parts of a graphic in Canva if it is an image.
How to erase part of a graphic in Canva?
You can do it with Magic Eraser or Magic Grab tool. to erase parts of a graphic. But only if the graphic is in an image format.
Other posts you may like on Canva:
Canva Highlights
- Canva overview
- How much is Canva Pro
- Canva vs Illustrator
- Kittl vs Canva
- Adobe Express vs Canva
- Is Canva better than Powerpoint?
- Envato vs Canva
- Canva vs Figma
- Piktochart vs Canva
- Visme vs Canva
- Canva Pro lifetime deal
- Canva coupons
Canva Guide & FAQs
- Can you add fonts to Canva?
- Are Canva fonts available for commercial use?
- Aesthetic fonts on Canva
- Can you use Canva offline?
- Can you upload a PowerPoint to Canva?
- How to wrap text in Canva
- Does Canva have spell check?
- Is Canva better than PowerPoint?
- How to convert Canva to PowerPoint?
- How to superscript in Canva
- How to group in Canva
- Canva Google slides
- How to curve text in Canva
- How to add page numbers in Canva


I love using canva – thanks for this really helpful guide
I am glad you liked it!